Make Clinics Smarter, Make Life Better.
EzCam
USB Intraoral Camera
01
STABLE PHOTOGRAPHY
Two capture buttons minimize motion
artifact even in maxillary photography
artifact even in maxillary photography
02
HIGH QUALITY IMAGE
Get clear image through auto-focus function
Reduce image distortion using aspherical lens
Reduce image distortion using aspherical lens
03
CONVENIENCE
Use it immediately without driver installation
Use it immediately without capture software installation
Automatic on/off control
Use it immediately without capture software installation
Automatic on/off control
WHY WE USE EZCAM?
SIMPLE, BUT ESSENTIAL
Intuitive and automatic On/off control
When you open your dental imaging software's acquisition feature, EzCam
will automatically turn on with light and the camera status indicator will
turn green. When you close the software’s acquisition feature, EzCam and
its light will automatically turn off and the camera status indicator will
change blue.
will automatically turn on with light and the camera status indicator will
turn green. When you close the software’s acquisition feature, EzCam and
its light will automatically turn off and the camera status indicator will
change blue.
Simple User interface
With EzCam, you don’t need to remember each setting. Its simple user
interface will reduce the using time and make work simpler and faster.
interface will reduce the using time and make work simpler and faster.
Excellent durability
EzCam is not a product assembled with a ready-made camera modules.
EzCam is designed to be durable with the internalized lens optics design
technology built into it.
technology built into it.
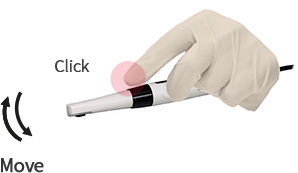
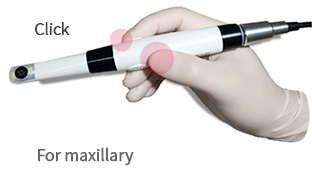
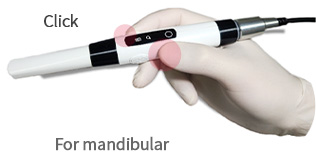
Two capture buttons minimize motion artifact
even in maxillary photography
As there are two capture buttons on both the left and right sides of the
camera, the thumb and index finger can provide a support for each other,
which results in stable positioning minimizing motion artifact. This button
arrangement let you stay much stable even in maxillary photography.
camera, the thumb and index finger can provide a support for each other,
which results in stable positioning minimizing motion artifact. This button
arrangement let you stay much stable even in maxillary photography.

Button on single side
Unstable
vs


Buttons on both sides
Stable
“40g” AS LIGHT AS AIRPODS
What happens when you use a heavy equipment...
The weakest part of the body is the carpe (wrist joint).
Taking numerous shots with a heavyweight equipment will
weaken and hurt the wrist joint.
weaken and hurt the wrist joint.
NO INSTALLATIONS,
PLUG AND PLAY
PLUG AND PLAY
No need USB Driver install
Ready to use by connecting only the cable
No need capture program install
Many other companies’ softwares require an installation of a
capture program to send an image capture signal. But EzCam doesn’t
require any installation, as it can create a capture key value by itself.
capture program to send an image capture signal. But EzCam doesn’t
require any installation, as it can create a capture key value by itself.
SHARP, CLEAR IMAGES
The EzCam really delivers where it counts : capturing vivid, high-resolution images
as easily as possible. Readily visible and obstructed areas take on a whole new light
and its aspheric lens prevents image distortions.
as easily as possible. Readily visible and obstructed areas take on a whole new light
and its aspheric lens prevents image distortions.
Since EzCam uses an aspherical lens,
it has less image distortion and therefore provides
excellent image quality suitable for diagnosis.
it has less image distortion and therefore provides
excellent image quality suitable for diagnosis.
Aspheric
Spherical
TRUE AUTOFOCUS OPTIMIZED
See detail of your ROI
Automatically focuses according to the distance between the
camera and the filmed object. When turn on the camera,
auto-focus mode starts. No manual adjustments required. You can also zoom-in and fix the focus by using macro button.
camera and the filmed object. When turn on the camera,
auto-focus mode starts. No manual adjustments required. You can also zoom-in and fix the focus by using macro button.
PRODUCT SPECIFICATIONS
| Image sensor | CMOS/5MP |
| Resolution | 1280X720 |
| Light source | 2 White LEDs |
| Focus range | 9mm~35mm |
| Angle of view | 62° |
| Length of cable | USB 2.0, 3m (Option: 5m) |
| Dimensions | 198 x 24 x 23mm |
| Weight | 40g (Handpiece only) |
| Operating Voltage | 5V DC, 500mA |
Instructions for TWAIN Driver Integration
How to integrate your imaging software with EzCam using TWAIN driver.
Please be informed that the installation of TWAIN driver is not a necessary step.
You only need to install it when it is required.
Step 1 – Plug in the EzCam to your PC.
- Then your PC will recognizes the EzCam camera and you can see a small alert on the bottom saying that new Hardware(EzCam) "USB Video Device" was recognized.
- Make sure that you plug the USB connector into a USB port, which supplies enough power. It is recommended to connect to the USB port on the back of the PC, as the USB port on the front of the PC or on the monitor may sometimes has insufficient power, since it is connected by a thin wire from the main board.
Step 2 – Download & install TWAIN driver file
- Please install the TWAIN driver file Download TWAIN driver Download path can be anywhere.
Step 3 – Launch Imaging Software and acquire clinical image using TWAIN driver
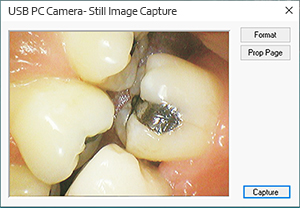
- After launching your imaging software and at the acquisition process, you will find our TWAIN driver named as "EzCam_TWAIN".
- Click the TWAIN driver and open the TWAIN capture window.

- Pressing the capture button on the camera will take a photo and save it to the patient chart.
※ Please contact sales@VATECHmcis.com for additional support.
FAQ

